We have already discussed on our blog how a well thought-out and well-designed footer on your email can ensure that your email complies with the law and avoids being marked as spam. The footer is a good place to include your contact information, invite recipients to visit your social media links, remind them why you are receiving the email, and include links to other important places (for example, your privacy policy or other news items on your website). In this short post, we remind you how to add a personalised footer to your emails when using Simplelists.

Email customisation
Personalising your Simplelists emails is quick and easy and including a personalised footer makes your emails look professional. You can include a logo, links to your website, a phone number and more. A personalised footer also saves you time and gives your emails consistency.
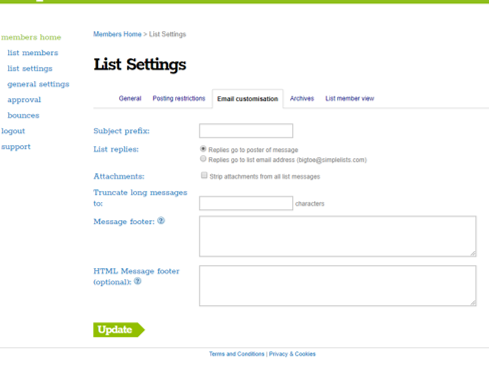
To add a personalised footer, simply log in and go to 'List settings’ in the left hand menu. Then, select the 'Email customisation’ tab on the main screen.

Scroll down to the 'Message footer’ box and then type your email signature into it.
Unsubscribe link
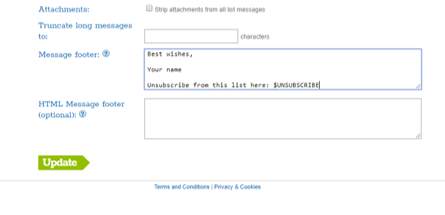
To include a link to allow your recipients to unsubscibe from your emails, add a '$’ sign follwed by the word 'UNSUBSCRIBE’, being sure to use capital letters. So, your example signature might look something like this:
Best wishes,
Your name
Unsubscribe from this list here: $UNSUBSCRIBE
When a list member then receives an email from you, they will see your signature and a clickable 'unsubscribe’ link at the bottom of the email.
Style your footer
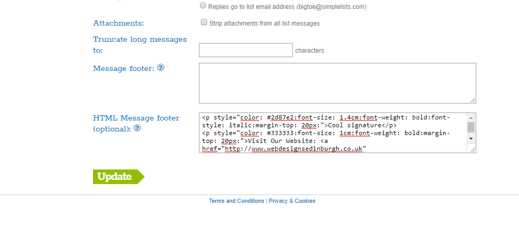
You also have the option to style your footer using HTML. You can do this in the next box down on the 'Email customisation’ page, called 'HMTL footer message’ (optional). You can include CSS to add colour, preferred fonts and other styles that match your website and/or brand. Make sure that you use inline styles as these are recognised by email clients such as Gmail and Hotmail. You can also include links to your website and/or other important pages. Simply copy and paste your HTML into the box.

You can watch a short video with these instructions in an earlier post on our blog.
